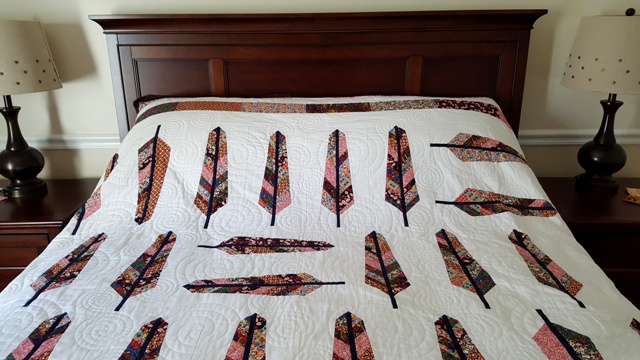
Feather Bed Quilt in Liberty of London’s Stile Collection

20151103_105253

It has been a year since I last posted here, I didn’t forget about blogging but as I was doing the groundwork for this article I think a couple things hit home for me: 1) sewing is a really solitary activity and coupled with being in a new place, it can get lonely and 2) I had to start using sewing as a way to connect with people in my area.

20150514_134545

I live in the Mid-west, and it is no surprise to anyone that Quilting thrives here. There’s a small group of clothing sewers but they’re small (and wonderful). I soon realized that if I wanted to meet more people I’d have to go with the flow a little bit and dabble in quilting. So I started quilting and I was unprepared for the level of joy it brought to me!

20150514_134536

I dove right in and and started working on Anna Maria Horner’s Feather Bed quilt pattern. When I showed the folks at my LQS (Local Quilt Shop), they were amazed at my progress, and my willingness to jump headfirst into a more complicated pattern. They were so encouraging, so helpful, and happy to share tips and tricks on how to make it as beautiful as I possibly could.

20151103_105307

Bit by bit, I plugged away at this quilt using a beautiful half-yard bundle of Liberty of London’s quilting/craft cottons “Stile” in the “spice” colorway (inspired by Charles Rennie Mackintosh). By May, I was finally able put it on a Long Arm and (with great help!) quilted it (using a computerized design, so not really much involved on my part). I finished (hand) binding it in September (watched a whole lotta Outlander!). Of everything I have made, this is the thing I am most proud of. I gifted it to my husband on our third wedding anniversary and it is happily used and loved.

20151103_105523

The pattern is available here on Anna Maria Horner’s Make Page. I am so grateful to Meredith of Olivia Jane Handcrafted for her efficient cutting tutorial. If you are planning on making this quilt, I highly suggest you start here. After a while I got tired of making so many feathers and enlarged my quilt to a queen size with a scrappy border. I used Robert Kaufman’s Kona Snow  Solid for the background because it is readily available everywhere (in case I ran out, which I did). For the binding I used a DS Quilts (Denyse Schmidt) print from one of her collections available at Jo-Ann’s. For the batting I used Quilter’s Dream “Dream Orient” and I’m very pleased with the drape and the warmth of it. I went with a plain white 108′ muslin for backing, there’s so much white in the background, I didn’t want any backing color or print showing through.

I pre-washed all my liberty, background and backing fabric, but not my batting. Many people warned me that reds bleed and the fabrics had quite a bit of red so I wanted to be on the safe side. I’m not sure where I stand on the pre-washing debate, I’ve serged fat eighths and pre-washed them and they shrank a little but it was a time commitment and I don’t know if I’ll do it again. I think I draw my limit at prewashing Jelly Rolls or Charm Packs.

Anyways, I think I can happily say that I’ve found some balance in terms of connecting with local area quilters through quilting and with the online sewing community through my love of apparel sewing. I’ve been sewing steadily through the year and I hope to share many more pictures of what I’ve been up to. On another note, I have a much nicer phone now and I joined Instagram, if you want to find me there I’m @BeautifullySewn.
Liberty Sureau Anniversary Dress

I haven’t forgotten sewing or my blog or your blogs, I’ve just been out and about but now I’m back.

I made my first Deer and Doe Sureau dress with some of the Liberty Tana Lawn I bought in London. I think Deer and Doe is fast becoming my favorite sewing pattern company because I just love everything about this dress (and their blog!). I used Anna from Paunnet’s Sureau Sew-Along (which was very helpful). I didn’t have to make any adjustments to size, but the neckline was a little too deep and slightly gaping. So I used Anna’s trick, and also took a tuck out of the neckline as well. I made two bodice muslins before I cut into my Tana Lawn. I didn’t line this dress because I don’t like so many layers in summer. I finished this dress at midnight just 6 hours before we had to head to the airport. Here’s are some (headless) pictures of the dress in action (it is a little wrinkly in the pictures) on the Hollywood walk of fame! I got compliments on the dress and the print! I left out the buttons but I may add them later on.

IMG_3305

IMG_3321

If you want to adjust the neckline, you can do what I did. In addition to straightening out the shoulder line (be mindful of seam allowances please!) as Anna posted, I took a small tuck from the neckline that eventually tapered into a point, a tiny dart from the front bodice.

Sureau Bodice Front

From the back I did the corresponding shoulder adjustment, and also shaded in the area that I would need to cut out for the neckline (see red circle) as it had to match up with the front bodice shoulder line. As usual, I had to redraft my facings with the new adjustments but that’s easy.

Sureau Bodice Back

For the next few days I’ll be catching up on all my favorite sewing blogs and seeing what you guys were doing!


Liberty and Minoru

It’s been a little quiet here lately because we went to London and Paris for a little break, and it was absolutely lovely. It was my first time in London and it truly is such a wonderful place to visit. Each big city has it’s own culture and vibrancy and I love feeling like I’m part of it, even if only for a little while. Only 2 days back and I miss hearing “mind the gap” or “doors will open on the right/left hand side” – Londoners, you guys have an amazing public transportation system! I can’t wait to visit again!

I also made the expected pilgrimage for any sewist visiting London – to Liberty of London on Regent Street and came back with some lovely treats! Tana Lawn (well actually I bought this from the infamous Shaukats – they’re licensed to sell Liberty prints at slightly cheaper price) and an adorable little cross stitch kit by Jane Greenoff with a pattern for the Liberty of London building (a befitting souvenir for a stitcher – this was from Liberty though!). I really love that place (esp the 3rd floor!), I saw the most amazing sewing and crafting things (case in point have you seen Felicity Hall’s DIY handbag kits? On my wishlist!), it was like a little slice of crafting paradise! Back to the fabric, I admire my tana lawn daily, a little creepy I know but it’s so buttery soft and I love the prints! William Morris’ “Strawberry Thief” is one of my favorite classic textile prints.

Liberty treats!

The city of Paris is just so beautiful, and filled with such effortlessly fashionable people. It was chilly there so I was able to admire all the different styles of coats that I saw. I kept thinking “Oh I have to make that for myself!”, so while I didn’t do any fabric shopping in Paris I did get inspired! That’s not to say Londoners aren’t fashionable, they’re very fashionable and I loved reading the fashion magazines there,  but the weather was just too cold and unpredictable (snowstorms, wind, hail, and sunshine all in one day) to actually do as much detailed people watching as I did in Paris.

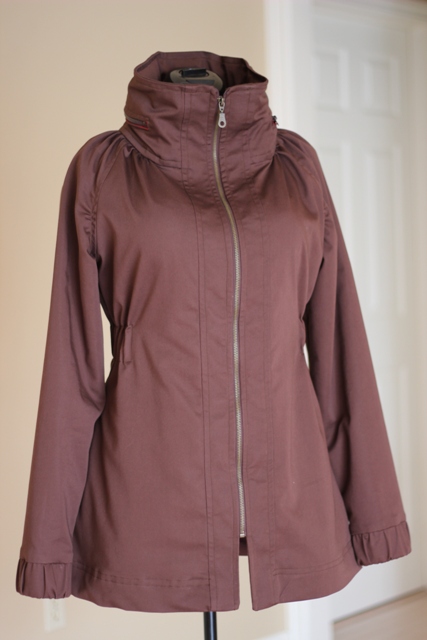
Before I left for Europe, I went into a last minute sewing frenzy to finish up what I started a year ago – my Minoru jacket! Well it’s complete and I can finally share it with you. I took the pics with a nicer camera (well, my husband took them) and I think they turned out so much nicer. I still have much to learn about proper photo styling though.

IMG_1215 - Copy

The fabric was a durable poly cotton stretch twill, I really love it and I lined it in a red rayon lining. I followed Tasia’s Sew-Along and the instructions were very straightforward. I just love the little details, like the hidden collar hood zipper, the ruffled cuffs, the gathered collar and the elastic waist. I followed Amy from Sew Well’s instruction’s on adding side seam pockets (see the little sliver of red on the hip?), and lined the hood in my own way (I wasn’t happy with the look of sewing it right sides together and turning it inside out). FYI, I found that an 18 inch zipper was too small for the collar zipper, so I got a bigger one and shortened it myself.

IMG_1217 - Copy

I also added the inside pockets but skipped adding velcro closures because I wasn’t sure if the lining could handle it. It probably could but I didn’t want to risk it. I love rayon lining, I’m not sure if its bemberg because it was super cheap and it seems a little lower quality but it still feels so great on my skin!

IMG_1226 - Copy

I also used a little decorative stitching on the little hanging loop, It’s one of my favorite details! Ignore the horrible “stitch in the ditch” – for some reason my  fabric and lining collars and placket’s weren’t lining up so I had to cut some off the top of the lining and that is probably why I couldn’t actually find “the ditch”.

IMG_1223 - Copy

I feel so productive!